Graphite Top Hat Sketch
This simple graphite sketch will improve your ability to discern values and not just shade an object the way you think it should be done - but the way it really is! The values are built up in a systematic way in this project, which is the best way to produce a realistic drawing.
|
Supplies:
White drawing paper Graphite pencils - HB and 2B Kneaded Eraser Blending Stump Paper Towel Directions: Read instructions below. Follow the slideshow for an illustration of each step. Be sure to also look carefully at the photo reference to the right! |
Photo Reference:
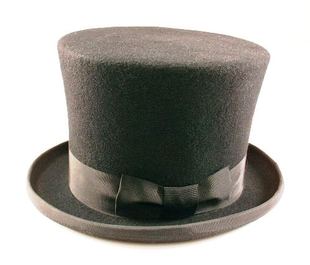 Top hat photo courtesy of www.morguefile.com |
Step-by-step Instructions:
1. Using an HB pencil, draw two ovals as shown.
2. Add the vertical lines and the bottom line to connect them.
3. Erase the back of the bottom oval.
4. Add the bottom rim of the brim.
5. Add the top of the ribbon.
6. Draw the shape of the center of the bow. It is not as tall as the ribbon.
7. Add the side shapes of the bow. At their outer edges, they extend above the ribbon.
8. Erase the inner lines inside the bow shapes.
9. Using a light pressure, carefully fill in the entire top hat with your HB pencil. Use the pointy tip, not the side of the pencil. Keep your strokes short and close together.
10. Wrap an edge of a paper towel around one finger and carefully blend the graphite. Use your kneaded eraser to clean up the edges if you went out of the lines at all.
11. Look for the dark areas of the hat: the center of the tower, inside the brim, and parts of the bow. Draw the shapes of these dark areas and fill them in with the HB pencil, using a medium-hard pressure.
12. Blend these areas with a paper towel and/or a blending stump.
13. Using your 2B pencil, look for the darkest areas within the shadows in the brim and draw their shapes. Fill them in with the 2B and blend with a blending stump.
14. Deepen the center of the shadow on the tower of the hat with the 2B pencil and blend. Use your HB to add the subtle shadows on the front of the brim.
15. Roll your kneaded eraser to a point and erase off any highlights you see in the photo reference. Look for highlights on the bow, the brim, and the top of the hat.
16. Use your 2B pencil to add a drop shadow under the brim. Blend this out with a blending stump.
Additional Graphite Resources:
Drawing and Rendering I: Graphite
This course is part of the Masterpiece Online Academy, and the Masterpiece Academy: Year One CD.
This course is part of the Masterpiece Online Academy, and the Masterpiece Academy: Year One CD.
